
How to Build a Topside Creeper: A Complete Guide
To build a topside creeper, gather materials like steel pipes, plywood, and padding. Follow a step-by-step guide to assemble it safely.
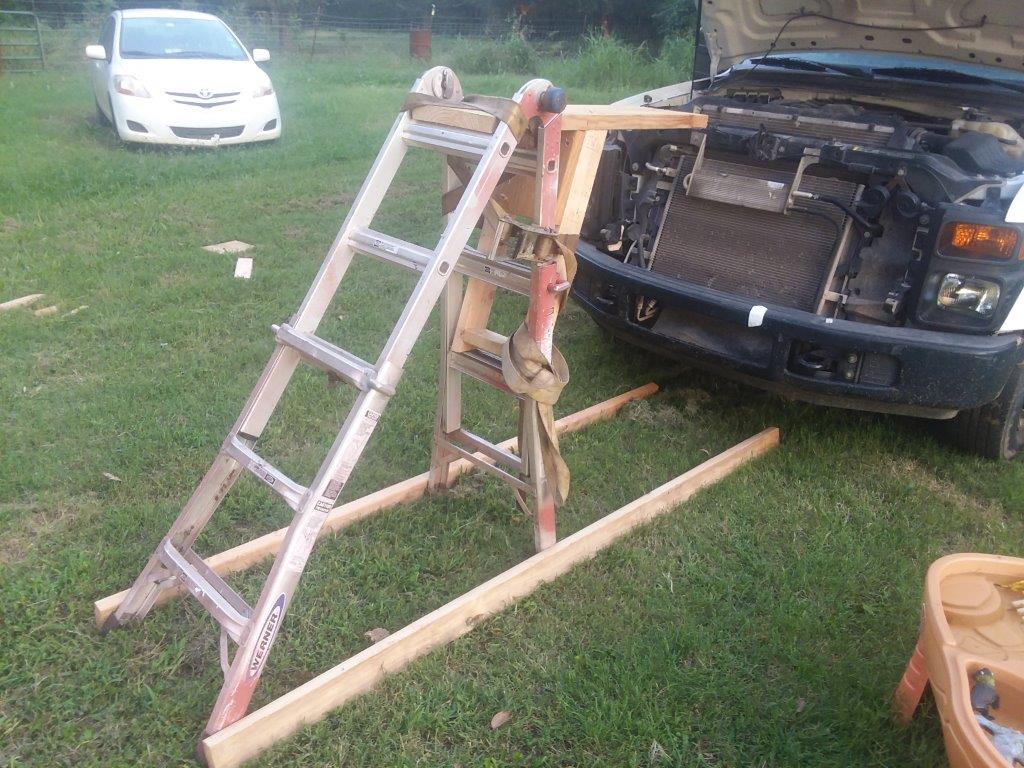
A topside creeper is an essential tool for mechanics and DIY enthusiasts working on elevated vehicles. This innovative device allows you to comfortably access hard-to-reach areas under the hood. Building your own topside creeper can save costs and be customized to your specific needs.
Start by sourcing sturdy materials such as steel pipes for the frame, plywood for the platform, and comfortable padding for the knee rest. Using a detailed guide will help ensure proper assembly and safety. A well-constructed topside creeper enhances productivity, reduces strain, and ensures you can perform maintenance tasks efficiently.
Materials Needed
Building a topside creeper yourself can save you money and offer a customized solution. Knowing the materials needed is crucial before starting the project. This section will cover all the essentials to get you started.
Essential Tools
Having the right tools makes the job easier and more efficient. Here’s a list of essential tools:
- Measuring Tape: For accurate measurements.
- Drill: To make holes and drive screws.
- Screwdriver: To tighten or loosen screws.
- Wrench: Useful for nuts and bolts.
- Hacksaw: To cut metal or wood.
- Level: Ensures your creeper is balanced.
- Pencil: For marking measurements.
Required Hardware And Supplies
Gathering the right hardware and supplies is equally important. Here’s what you’ll need:
| Item | Description |
|---|---|
| Wooden Planks | For the frame and steps, sturdy and reliable. |
| Metal Brackets | To reinforce the structure, providing durability. |
| Screws | Various sizes for assembling different parts. |
| Nuts and Bolts | For secure connections. |
| Foam Padding | For comfort while working on the creeper. |
| Paint or Varnish | To protect the wood and give it a polished look. |
These materials and tools are fundamental for building a sturdy and reliable topside creeper. Make sure to gather all items before starting the project. This ensures a smooth and uninterrupted building process.
Preparing Your Workspace
Building a topside creeper can be a fun and rewarding project. The first step is to prepare your workspace. A well-organized workspace ensures safety and efficiency. Let’s explore the key aspects to consider.
Safety Considerations
Safety should be your top priority. Here are some essential tips:
- Clear the Area: Ensure your workspace is free of clutter.
- Wear Protective Gear: Use gloves, goggles, and sturdy shoes.
- Ventilation: Work in a well-ventilated area to avoid fumes.
- First Aid Kit: Keep a first aid kit within reach.
Organizing Your Tools
Having your tools organized will save you time and effort. Here’s a simple guide:
| Tool | Purpose |
|---|---|
| Wrench Set | Tightening and loosening bolts |
| Measuring Tape | Accurate measurements |
| Screwdrivers | Installing screws |
| Electric Drill | Drilling holes |
Follow these simple steps to organize your tools:
- Sort: Group tools by type and size.
- Label: Use labels to identify tool locations.
- Store: Place tools in a toolbox or on a pegboard.
Preparing your workspace properly is crucial for building a topside creeper. It ensures a smooth and safe construction process.
Building The Frame
Constructing the frame of your topside creeper is a crucial step. It ensures the stability and durability of the entire structure. This section will guide you through the process of measuring, cutting, and assembling the base of your topside creeper frame.
Measuring And Cutting
First, gather all the required materials. You’ll need metal pipes, a tape measure, and a cutting tool.
- Tape measure: Use it to get accurate measurements.
- Metal pipes: These will form the frame.
- Cutting tool: Ensure it’s suitable for cutting metal.
Follow these steps for precise measurement and cutting:
- Measure the height, width, and length needed for your frame.
- Mark the measurements on the metal pipes.
- Use the cutting tool to cut the pipes at the marked points.
Double-check each measurement before cutting. This ensures accuracy and minimizes waste.
Assembling The Base
Now that you have all the parts cut, it’s time to assemble the base.
Follow these steps to put the base together:
- Lay out the cut metal pipes on a flat surface.
- Align the pipes according to your design layout.
- Use screws or welding to join the pipes at each corner.
- Ensure all joints are securely fastened.
Check for stability by gently shaking the assembled base. Ensure there is no wobbling.
If you notice any instability, reinforce the joints with additional screws or welds.
Your frame’s base is now ready. This sturdy foundation will support the rest of your topside creeper.

Adding The Platform
Adding the platform is a crucial step in building a topside creeper. It ensures stability and comfort while working on your vehicle. Below, we will guide you through selecting the material and attaching the platform.
Selecting The Material
Choosing the right material is vital for safety and durability. Here are some options:
| Material | Pros | Cons |
|---|---|---|
| Wood |
|
|
| Aluminum |
|
|
| Steel |
|
|
Attaching The Platform
Once you have your material, it’s time to attach the platform:
- Measure the Frame: Ensure the platform fits snugly on the frame.
- Cut the Material: Use a saw for wood or metal cutter for aluminum/steel.
- Secure the Edges: Sand down any rough edges to prevent injury.
- Drill Holes: Create holes for screws or bolts at each corner.
- Attach the Platform: Use screws or bolts to secure the platform to the frame.
- Check Stability: Ensure the platform is secure and does not wobble.
By following these steps, you can ensure your topside creeper is safe and functional. Selecting the right material and securely attaching the platform are key to a successful build.
Installing The Wheels
Installing wheels on your topside creeper is a crucial step. It ensures mobility and ease of use. Follow these steps to choose and secure the wheels correctly.
Choosing The Right Wheels
Choosing the right wheels is essential for stability and smooth movement. Here are some tips to select the best wheels:
- Weight Capacity: Ensure the wheels can support the creeper’s weight.
- Size: Larger wheels offer better movement on uneven surfaces.
- Material: Rubber wheels provide better grip and durability.
- Locking Mechanism: Wheels with locks ensure the creeper stays in place.
Consider these factors to make an informed decision. The right wheels improve your creeper’s functionality.
Securing The Wheels
Securing the wheels properly ensures safety and stability. Follow these steps to attach the wheels:
- Gather Tools: You need a wrench, screws, and washers.
- Position Wheels: Place the wheels at the designated spots on the frame.
- Insert Screws: Use screws and washers to attach the wheels.
- Tighten Screws: Use a wrench to tighten the screws securely.
- Test Stability: Ensure the wheels are firmly in place and test the movement.
Properly secured wheels guarantee that your topside creeper is safe and functional.

Finishing Touches
Finishing touches make your topside creeper look professional and last longer. These steps ensure the creeper is safe and visually appealing. Focus on sanding, smoothing, painting, and coating.
Sanding And Smoothing
Start by sanding all the surfaces of your creeper. Use coarse sandpaper first. This removes any rough edges and splinters. Next, switch to finer sandpaper. This step smooths out the surface. Make sure to sand every nook and cranny.
Scrutinize the creeper. Feel for any rough spots. Sand those areas again if needed. A smooth surface is important for painting and ensures user safety. After sanding, wipe down the creeper with a damp cloth to remove dust.
Painting And Coating
Choose a high-quality paint for your topside creeper. Paint protects the wood and gives it a nice finish. Begin with a primer coat. This helps the paint adhere better. Allow the primer to dry completely. Then, apply the first coat of paint.
Use even strokes for a smooth finish. After the first coat dries, apply a second coat. This ensures even coverage and durability. Once the paint is dry, consider adding a protective coating. A clear coat or sealant works well. This extra layer protects the paint and wood from wear and tear.
| Step | Material | Tools |
|---|---|---|
| Sanding | Sandpaper (coarse and fine) | Hand sander |
| Painting | Primer, Paint | Paintbrush, Rollers |
| Coating | Clear coat or sealant | Paintbrush, Rollers |
- Sanding and smoothing ensure a safe, splinter-free surface.
- Painting adds protection and visual appeal.
- Coating gives extra durability to your creeper.
- Sand with coarse sandpaper.
- Sand with fine sandpaper.
- Wipe off dust.
- Apply primer.
- Paint the first coat.
- Paint the second coat.
- Apply protective coating.
Testing And Adjustments
Testing and adjusting your newly built topside creeper is crucial. Ensuring stability and functionality is key. This section will guide you through the necessary steps.
Checking For Stability
Place the topside creeper on a flat surface. Make sure it stands firmly. Gently press down on different parts of the creeper. Check for any wobbling or instability.
If the creeper wobbles, it may be due to uneven legs. Use a spirit level to check the alignment of each leg. Stability is essential for safe usage.
| Step | Action | Tool |
|---|---|---|
| 1 | Place on flat surface | None |
| 2 | Check for wobble | None |
| 3 | Align legs | Spirit level |
Making Necessary Adjustments
After checking for stability, adjustments might be needed. Adjust the height and position of the legs first. Tighten all screws and bolts properly.
- Loosen the adjustable parts using a wrench.
- Move the legs to the desired height.
- Use the spirit level to ensure evenness.
- Tighten all screws and bolts firmly.
Test the creeper again after making adjustments. Ensure there is no wobble. Safety must be a priority. A stable creeper minimizes accidents and injuries.
Regularly inspect the creeper for any signs of wear or damage. Periodic adjustments may be required to maintain stability.
Maintenance Tips
Maintaining a topside creeper ensures its longevity and safety. Follow these tips to keep it in excellent condition.
Regular Inspections
Inspect your topside creeper regularly for any wear and tear. Check for loose bolts, nuts, and screws.
- Look for cracks in the frame.
- Ensure all parts are securely fastened.
- Replace damaged parts immediately.
Lubrication And Care
Proper lubrication keeps your creeper moving smoothly. Use quality lubricants for best results.
| Part | Lubricant | Frequency |
|---|---|---|
| Joints | Silicone Spray | Monthly |
| Wheels | Grease | Quarterly |
Wipe down the creeper after each use. Store it in a dry place to avoid rust.
Frequently Asked Questions
What Is A Topside Creeper?
A topside creeper is a tool that helps mechanics reach over the engine bay of vehicles easily.
Why Build Your Own Topside Creeper?
Building your own topside creeper can save money and allow customization to suit your specific needs.
What Materials Are Needed?
You’ll need wood, screws, bolts, padding, and metal tubing. Ensure all materials are durable and safe.
How To Start The Building Process?
Begin by measuring and cutting the wood to the desired dimensions. Assemble the frame securely with screws.
How To Ensure Stability?
Use sturdy materials and secure all joints tightly. Test the structure for stability before using it.
Can A Topside Creeper Be Adjusted?
Yes, you can design it with adjustable heights to accommodate different vehicle sizes and personal comfort.
Conclusion
Building a topside creeper can greatly improve your automotive repair experience. Follow the steps outlined for a sturdy, reliable tool. This DIY project not only saves money but also enhances safety and comfort. Start your build today and enjoy easier access to engine compartments, making repairs smoother and more efficient.