
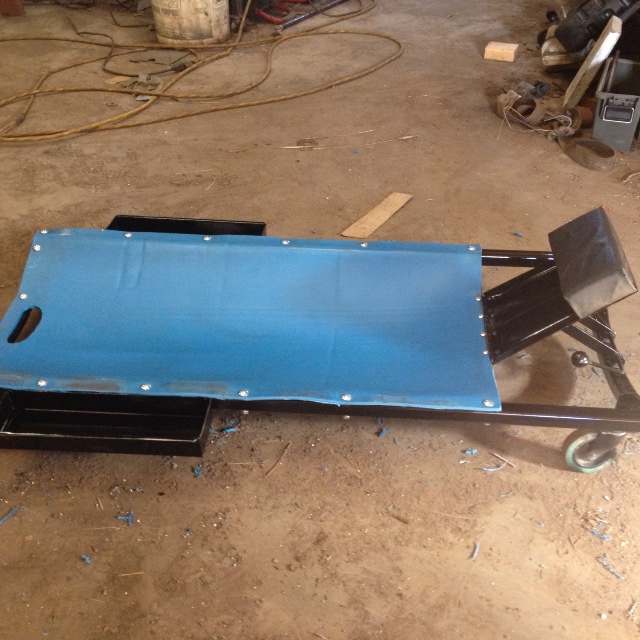
DIY Mechanic Creeper: Build Your Own Garage Essential
A mechanic creeper is essential for DIY car enthusiasts. It offers comfort and mobility while working under cars. The creeper’s design includes a padded body support and swivel casters for easy movement. This tool reduces strain on the back and neck, making prolonged work sessions manageable.
Creepers come in various styles, including foldable and adjustable models. Some even have built-in trays for tools. Investing in a quality mechanic creeper enhances efficiency and safety in automotive tasks. It’s an indispensable addition to any home garage, aiding in everything from oil changes to more complex repairs.
Materials Needed
Building your own mechanic creeper can be fun and rewarding. Before starting, gather all the necessary materials. This section outlines everything you need to create a durable and functional creeper.
Essential Tools
- Drill – A power drill makes holes for screws.
- Screwdriver – Use this to fasten screws securely.
- Measuring Tape – Measure materials accurately.
- Saw – Cut wood or metal to the right size.
- Wrench – Tighten or loosen bolts and nuts.
Recommended Materials
| Material | Purpose |
|---|---|
| Plywood | Base for the creeper |
| Foam Padding | Comfortable surface to lie on |
| Vinyl Fabric | Cover for the foam padding |
| Casters | Wheels for mobility |
| Screws and Bolts | Fasten all components together |
Design Options
Choosing the right design for your DIY mechanic creeper can improve your work efficiency. There are various design options available, ranging from basic to advanced. Let’s explore some popular choices.
Basic Design
The basic design of a mechanic creeper includes a simple frame and wheels. This design is easy to build and cost-effective. It usually consists of:
- A sturdy wooden or metal frame
- Four to six caster wheels for easy movement
- A padded surface for comfort
A table below shows the materials needed:
| Material | Quantity |
|---|---|
| Wooden planks | 2-3 |
| Caster wheels | 4-6 |
| Foam padding | 1 sheet |
| Fabric cover | 1 piece |
Advanced Features
For those seeking more functionality, consider adding advanced features. These enhancements can make your creeper more versatile. Some advanced features include:
- Adjustable headrest for added comfort
- Tool trays to keep tools within reach
- Lighting options for better visibility
- Height adjustment for different working positions
These features can be added using:
- Adjustable hinges for the headrest
- Small trays or pockets for tools
- LED strips for lighting
- Adjustable legs or hydraulic lifts
Incorporating these design options will help you create a creeper that meets your specific needs. Choose wisely based on your requirements and budget.

Step-by-step Instructions
Building your own mechanic creeper can be fun and rewarding. Follow these step-by-step instructions to create a functional and comfortable creeper. This guide will help you through every step of the process.
Cutting The Wood
Start by preparing the wood pieces. You’ll need:
- Two long pieces for the sides (48 inches each)
- Two shorter pieces for the ends (16 inches each)
- One large piece for the base (48×16 inches)
Use a saw to cut these pieces accurately. Sand the edges to remove any splinters. Ensure all pieces are smooth.
Assembling The Frame
Now it’s time to assemble the frame. Follow these steps:
- Lay the long pieces parallel on a flat surface.
- Place the shorter pieces at the ends to form a rectangle.
- Use screws and a drill to secure the corners.
Double-check that the frame is sturdy. It should not wobble.
Adding Wheels
Adding wheels will make your creeper mobile. You’ll need:
- Four swivel casters
- Screws and washers
Attach each caster to the corners of the frame. Ensure they are secure and can rotate freely.
Cushioning The Surface
For comfort, add cushioning to the surface. You can use:
- Foam padding
- Vinyl fabric
Cut the foam to fit the base. Cover it with vinyl fabric. Use a staple gun to secure the fabric underneath the base.
Now, your DIY mechanic creeper is ready to use. Enjoy the comfort and mobility it provides.
Safety Tips
Using a DIY mechanic creeper can make car repairs easier. Safety is the top priority. Follow these tips to stay safe while using your creeper.
Proper Use
Ensure you use the creeper on a flat, stable surface. This prevents accidents. Always check the surrounding area for any hazards. Keep tools and parts organized. Wear appropriate clothing. Loose clothes can get caught in moving parts. Use the creeper’s handle to move around. Avoid pushing off with your feet.
Maintenance Advice
Regular maintenance ensures your creeper lasts longer. Check the wheels for wear and tear. Replace them if needed. Keep the creeper clean. Wipe off any grease or oil. Inspect the frame for cracks or damage. Tighten any loose bolts or screws. Lubricate the wheels for smooth movement. Store the creeper in a dry place. This prevents rust and corrosion.
| Maintenance Task | Frequency |
|---|---|
| Check wheels | Monthly |
| Clean frame | After each use |
| Inspect for damage | Monthly |
| Lubricate wheels | Quarterly |
Following these safety tips and maintenance advice will keep you safe. Your DIY mechanic creeper will also last longer.
Customization Ideas
Customizing your DIY mechanic creeper can make it more fun and useful. You can add personal touches that suit your style and needs. Here are some great ideas to get started.
Personalized Paint Jobs
A personalized paint job can make your creeper stand out. Choose colors that match your workshop or favorite team. Use stencils to add cool designs or your name. This makes the creeper uniquely yours.
Consider using spray paint for a smooth finish. You can find special paints that resist oil and grease. This keeps your creeper looking good for longer. Be sure to paint in a well-ventilated area.
Extra Storage
Adding extra storage to your creeper can keep tools handy. This saves time and keeps your workspace organized. You can attach small bins or pouches to the sides.
| Storage Option | Benefits |
|---|---|
| Magnetic Strips | Hold metal tools securely |
| Tool Pouches | Store small items like screws |
| Velcro Straps | Keep larger tools in place |
Use a mix of these options for the best results. Keep frequently used tools within easy reach. This makes your work faster and more efficient.

Common Mistakes
Creating a DIY mechanic creeper can be fun and rewarding. But many people make common mistakes during the process. These mistakes can affect the creeper’s performance and safety. Knowing what to avoid can save time and effort.
Avoiding Weak Joints
Weak joints can make your creeper unsafe. Strong joints are essential for a durable creeper. Use high-quality screws and bolts. Avoid using nails as they may loosen over time.
Consider adding metal brackets for extra strength. They provide additional support to joints. Use a drill to make precise holes. This ensures screws fit tightly.
| Tool | Purpose |
|---|---|
| Drill | Make precise holes |
| Metal Brackets | Add strength to joints |
Ensuring Smooth Mobility
Your creeper must move smoothly. Good wheels are crucial for this. Use swivel casters for better mobility. Check wheel quality before buying. Poor-quality wheels can break easily.
Ensure wheels are evenly spaced. This helps in smooth movement. Use a measuring tape for accurate spacing. Install wheels with lock nuts to keep them secure.
- Use swivel casters
- Check wheel quality
- Space wheels evenly
- Install with lock nuts
Frequently Asked Questions
What Is A Diy Mechanic Creeper?
A DIY mechanic creeper is a low-profile board with wheels, allowing mechanics to slide under vehicles easily.
How To Build A Diy Mechanic Creeper?
To build a DIY mechanic creeper, you need plywood, casters, padding, and basic tools like a drill and screws.
What Materials Are Best For A Mechanic Creeper?
Plywood, durable casters, and comfortable padding are ideal materials for a sturdy and comfortable mechanic creeper.
Can I Customize My Mechanic Creeper?
Yes, you can customize it by adding features like storage compartments, adjustable headrests, or different caster types.
How Much Does It Cost To Make One?
The cost varies but typically ranges between $30 to $60, depending on materials and added features.
What Are The Benefits Of A Diy Creeper?
A DIY creeper is cost-effective, customizable, and allows you to tailor it to your specific needs and preferences.
Conclusion
Crafting your own mechanic creeper is both rewarding and cost-effective. This project enhances garage efficiency and comfort. Save money while gaining a practical tool. With basic materials and tools, anyone can build one. Enjoy the satisfaction of a job well done and improve your mechanic experience today.